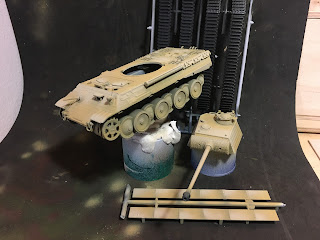
I decided to give a go to a see through winter camo for the youngsters of my 12nd SS Panzerdivision HJ
Unfortunately I missed some pictures in the step by step, you have to use a bit of imagination, I'll try to be as descriptive as possible
Step 1. Basecoat
As you need to apply several layers of paints and other products, strip down and scrape some of them you need a very high quality primer. I've used Vallejo Black Polyurethane Primer but Army Painter's spray it's a good one too.
Step 2.
Leaving black in the recesses I've airbrushed Dunkelgelb (I use Tamyia for spraying so it's XF 60 Dark yellow) and modulated the color adding more and more lighter color (Tamiya XF 55 Deck Tan)
To be honest, the modulation it's a step you could easily jump, seen the amount of layers, and weathering you will apply in the later steps.
Step 3.
I've airbrushed quite roughly the 3 tone striped camo (Tamiya Flat Brown XF 10 and Tamiya Dark Green XF 81)
Step 4.
With the sponge technique, that is basically made by dipping a corner of the blister grey sponge in your usual acrylic paint and gently tap the corner, I've made some chipping with a lighter color (it's plenty of tutorials online just have a quick search on Youtube)
Step 5.
Early Filter. I've applied a filter, I'm a bit old school so I've used Oil Paints diluited in White Spirit (to me the best medium to apply filters and washes). The purpose of the filter is to add depth to the color not really to create a shaded effect, so pick the colors that match rougly the base you are filtering, I've used burnt umber and olive green.
Step 6.
Very important step, Sealing
It's important to preserve what has been done so far, as we will brush, and scrape things up,
I've used a clar gloss, because it helps to remove the paint later on.
Step 7
HAIRSPRAY! again, I'm a bit old school, they do exist proper chipping fluids (AK Interactive, MIG etc.) I'm not too keen on enamel based effects, as they require another thinner to work and I don't have much space left on my painting station..
Hairspray basically works as a removable layer base for the white winter wash paint I'll add in the next couple of steps.
Step 8.
I bought some modelling masking tape, very cheap and perfect in size, and I've attached it carefully to my model.
Step 9.
I've sprayed my usual white acrylic paint, making sure I didn't 100% cover completely the area but left dome see thru in some places
Step 10.
Now you will see why you need a proper primer, because even if you are super delicate, removing the tape can damage all the underlying layers exposing the base plastic!
Step 11.
Toothbrush! Yes, you need, with the help of a bit of water, to scrape some of the white paint off the model, basically melting the hairspray layer (and his above white layer). What you need to do is to gently rub the area with a wet toothbrush with a circular motion, then leave it for a few second while you rub another part, when you go back to the previous the magic will happen, and you will see bits of the undelying layer coming thru.
you can repeat Step 8, 9, 10, 11 as many times you want.
After a couple of time I've damaged the decals so I changed them! you will see a different numbering on the finished tank!
Step 11.
I've then classically added some washes in the panels to increase contrast in the various part of the tank, I've used browns (Burnt and Natural Umber) orange (Cadmium Orange) and greens (Olive Green and Oxide of Chromium) and some striking marks with Naples Yellow on the sideskirts and exposed Dunkelgelb areas.


Nessun commento:
Posta un commento